
 |
| Basic supplies for crafts |
Store bought greetings card can be generic and expensive. The one you get at a store often doesn't match with your feelings that you want to express by a card, even if it matches, the design may be boring. Ever desired of making something new for your someone special? But you don't know from where to start...
No, now don't give me excuses that you tried and you failed which means you are not that creative. Learn and follow my steps, prep your own extraordinary template. You can use things of your choice.
Here's some idea from where to start off.
Materials Required :
1. Patterned and cardstock papers / scrapbook papers (any paper of little thickness)
2. Adhesives - pva glue or gluestick, tapes
3. A pair of scissors
4. Punching (optional)
5. Marker pens
6. Glitter pens
7. Rubber Stamps (optional)
8. Metal scale
9. Colours you prefer (It can be organic colours)
Procedure :
1. Experiment with your Cardstock →
It comes in a lot of design and texture : shimmer, printed, plain etc. The thicker and smoother the cardstock, the more high quality your finished card will look. Press your cardstock using a metal scale for perfect finish. It will look more professional.
 |
| Plain Cardstock Paper |
2. Experiment with Scrapebook Paper →
This paper is more thinner, but as a beginner you can use it as your base designer template. You can also cut shapes out of scrapbook paper and use them to decorate.
3. To decorate →
Use marker pens to write message on your card. You can use glitter pens to design, buy grid of stickers to paste cute impression.
4. Use your sewing skills →
Draw flowers or any picture of your choice with pencil. Sew it out. You can sew colourful buttons to make a pattern or pistil of a sewed flower. Add ribbons. Add wool. Add pieces of old jeans or any printed colourful cloth.
 |
| Sewed Greeting Card |
5. Press real flowers →
Try pressing flowers and using them to decorate your greeting card. Place your flowers facedown in a thick book lined with parchment paper and allow them to press for a week before removing them. You can put more weight over the thick book. You can also use pressed leaves.
 |
| Dried and Pressed Pansy |
6. Use organic colours →
Prepare your own colour to paint or dye your page. Use vegetables and fruits, even coffee to give you colour.
Vegetables like onion skin gives a shade of colours : brick red, light magenta and yellow shades, beetroot gives you a deep pink and burgandy coulour, turmeric for bright yellow, red cabbage for purple/light blue shade, blueberries for deep blue, pomegranate for red. Combine these colours to find more.
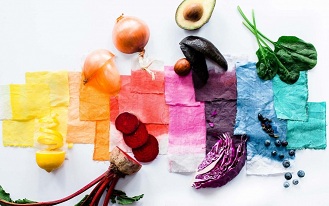 |
| Organic Dyes |
7. Use Brads →
Use a brad on your greeting card as paper fasteners, make a small hole in your card using a needle or pin. Stick the prongs of the brad through the hole, then spread the prongs to attach the brad to the card.
8. Use scale →
Perfect dents and measurements are the key to make an impressive card. Make folds, measure with scale, even use your origamy skills.
Use popsicle sticks, quiling art.
Be creative, almost anything you find in your home, waste can be recycled and reused. Even the cardstock paper can be reused from old cards. I will help you to learn step by step in my upcoming blogs. Create your own template.
Don't forget to share your thoughts if you liked it or not, and also your own innovative style in the comment section. Spread happiness☺
☺❤Go & Try it now !!!

Comments
Post a Comment